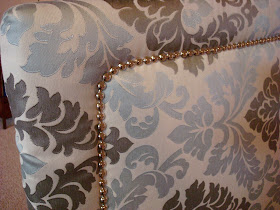
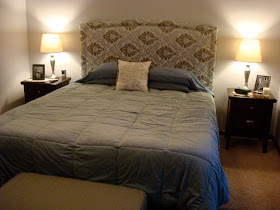
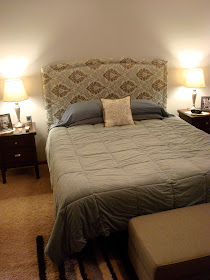
My journey to make an upholstered headboard (with nail head trim) has come to an end!
You may remember from previous posts, I was on a mission to make a king size headboard for my mom and dad's lackluster bedroom.
I had NO experience making one... so I found inspiration from a few websites:
I also enlisted the help of my dad... who can build A-N-Y-T-H-I-N-G.
FIRST...
We started with a standard 4x8 sheet of plywood from the hardware store.
(This one was 3/4 of an inch thick.)
You can have the hardware store cut the plywood to the desired length/height of your headboard... but my dad decided to do it himself.
Ours was about 74 inches long, 48 inches tall.
(We cut it out with a skill saw.)
SECOND...
Once our plywood was cut accordingly, it was time to decide on a SHAPE for the headboard!
In order to make sure we got an EXACT rounded top... we put a nail THREE INCHES from the top of our headboard (on both sides.)
Then, we marked where the CENTER of the headboard was...
and placed a plastic pipe directly underneath both nail heads.
You lift the pipe VERY GENTLY... in the center of the headboard...
... and draw a line (around the top of the pipe) with a pencil.
Then, you can take a jig saw or a reciprocating saw and cut along the pencil mark.
Once it's cut, smooth out the top of the headboard with some sandpaper.
THIRD...
Take a 1x6 piece of wood, and place it UNDERNEATH the curved portion of your headboard.
(We are adding a second layer - in order to "bulk" it up.)
Trace the curved part onto the piece of 1x6.
Cut it out with a band saw.
FOURTH...
Squeeze some "Liquid Nails" onto the 1x6.
(You can buy this at the hardware store.)
Then SCREW the 1x6 onto the rounded top portion of your headboard.
(Make sure they match up!)
You'll also need two 1x4's for the legs of your headboard.
Make sure you measure accordingly - then cut.
For example, we wanted our headboard to be 61 inches tall (with legs!!!)
So, we knew our 1x4's had to be 61 inches tall.
(13 inches would be hanging off the headboard portion.)
Make sure you double up the BOTTOM portion of the legs with extra scraps of 1x4's.
Use more "Liquid Nails" - and screw in place.
Whew.
The project is half over.
FIFTH...
Once your headboard is built, you'll have two VERY different sides.
"Side 1"
There's a noticeable gap between the pieces of wood.
"Side 2"
Very smooth.
We decided to use "Side 2" for the FRONT of the headboard.
SIXTH...
Place a large sheet of BATTING on the floor.
I ended up using 2 layers of batting.
(You'll need this in order to make the headboard soft. You can buy batting at any fabric store.)
Then... get out your staple gun... and LOTS of staples!!!
(If you need to purchase these, they are sold at Hobby Lobby, Home Depot, etc.)
Wrap the batting TIGHTLY around the sides of the headboard...
... and staple in place.
Cut out smaller pieces of batting for the legs.
Wrap, and secure with staples.
SEVENTH...
Once your headboard is wrapped TWICE with batting, it's time to move on to FABRIC!
Make sure your fabric has seen an IRON.
You don't want any wrinkles!!!
Put the fabric on a CLEAN floor (face side down.)
Place your padded headboard ON TOP of the fabric.
Once again... wrap the edges TIGHTLY around the headboard... and staple in place.
Don't worry TOO much if your legs don't turn out perfectly.
(They'll be 98% hidden behind the mattress.)
Whew.
After LOTS of staples... you're finally ready to move on to the next chapter.
EIGHTH...
It's time to add decorative nailhead trim!
(This is optional... but I highly, highly recommend doing it.)
You can find nailhead trim at craft stores such as: Joann or Hancock Frabrics.
Otherwise, you can order it online at Amazon.
Typically, you'll only need one roll.
Measure HOW FAR IN you want your nailhead trim to start.
We decided on four inches.
Then, we used painter's tape... and a level... to make even lines on both sides.
As for the CURVED top portion of the headboard???
We took a piece of wood (4 inches wide)... and gradually moved it along the top... making small pencil markings on the fabric.
(Don't worry - the nailhead will cover the pencil markings!)
Then, follow the edge of the tape (and your pencil markings)... and nail the nailhead trim into place.
You'll want to use a rubber mallet for nailing.
But, if you don't have a mallet...
You can always place a sock over a hammer.
The entire process is very tedious... but so worth it!
NINTH...
Once you're done with the nailhead trim, it's time to secure your headboard in place!
1.) You can attach "D rings" to the back of the headboard - and attach to the wall.
OR
2.) You can drill two holes into each leg of the headboard - use a rubber mallet to BANG bolts through the holes - then attach to your bed frame.
Finished!!
Turned out pretty great!
We added a few other elements to the room too.
#1...
We painted the walls "Sterling" - bought at the Home Depot.
#2...
I framed a few scraps from the leftover headboard fabric.
#3...
I added framed photographs to the bedside tables.
"D" for Duane - my dad's name.
"S" for Sue - my mom's name.
(I took the pictures at my parents' old house... so they are cute little reminders.)
BEFORE
AFTER
Hopefully this helps you with your DIY headboard project!
Just remember to be patient... and take your time.
It's a tedious project - that took my dad and I about six hours to complete.
Good luck!


